Wednesday, November 26, 2025

FREE PATTERN: Clover Amour Crochet Hook Case


During a recent Amazon Prime Day, after coveting them for almost 1 year, I finally ended up buying a complete set of ergonomic Clover Amour crochet hooks to replace my hodge podge collection of non-ergonomic Boye and Susan Bates hooks. I wanted to make a zippered case to hold them all. The pattern below is how I crocheted the case.

PATTERN

This zippered case was designed to fit an entire set of Clover Amour crochet hooks with ergonomic handles. Constructed sideways, this pattern can be adapted to fit other hooks with ergonomic handles by changing the case height (as determined by the length of Row 1). The pocket heights are tall enough to hold the Clover Amour hooks securely, but short enough so that the color of each handle is visible. The front cover features a decorative clover to indicate the case contents. To provide added protection for the hooks, the cover can be given more stiffness through the use of optional plastic inserts into the cover. Since the hook pockets and case are constructed seamlessly, the only sewing involved is at the very end to attach the zipper.

MATERIALS:

  • Crochet hook, US size G (4.0 mm)
  • Crochet stitch markers
  • One 18-inch zipper (I only had a 16-inch zipper in my stash, so that’s what I used in the above pictured item.  However I discovered that 16 inches is a tad bit too short, so I recommend that you use an 18-inch zipper so that the case can lay totally flat when opened.)
  • Color A: Approx 115 yards of worsted weight yarn for the case lining/pockets and front motif
  • Color B: Approx 115 yards of worsted weight yarn for cover. 
  • Thread that matches or coordinates with color B to hand-sew zipper to case. 
  • A needle to hand-sew zipper to case.
  • Optional: Plastic canvas to make cover stiff. I used plastic salvaged from disposable plastic take-out food containers.
  • Optional: Sewing pins or sewing clips to help hold zipper in place while hand-sewing.

ABBREVIATIONS:

  • BLO = crochet into the back loops only of each stitch 
  • ch = chain
  • FLO = crochet into the front loops only of each stitch 
  • hdc = half double crochet
  • sc = single crochet
  • sl st = slip stitch
  • st(s) = stitch (es)
  • [ ] = work directions in brackets the number of times specified 
  • Numbers in () = number of stitches at the end of that round.

INSTRUCTIONS

LINING: SIZE B-F HOOK POCKETS

  • Using yarn color A: Ch 27.
  • Row 1: Sc in the 2nd ch from hook and in each ch across; ch 1, turn. (26 sts) (Note: the ch 1 does not count as the first sc in the next row for this pattern.)
  • Row 2: Sc in each of the next 11 sts, sc in FLO of the next 15 sts to form the back of the hook pocket; turn counter clockwise; sc in the free loops of the same 15 sc to form the front of the hook pocket; ch 1, turn; dc in the next 15 sts to form the front of the hook pocket, sc in the next 26 sts to form the back of the hook pocket; ch 1, turn. (41 sts)
  • Row 3: sc 26, dc 15, turn, sc 15, chain 2, yarn-over, insert hook through the nearest dc of the pocket front AND through the nearest sc of the pocket back, complete hdc; [yarn-over, insert hook through the next dc of the pocket front and through the next sc of the pocket back, complete hdc] x 14 times to completely close hook pocket; hdc 11; ch 1, turn. (26 sts)
  • Rows 4-11: (Repeat rows 2 and 3) 4 more times.

LINING: SPINE

  • Row 12: Sc in the BLO of each st across; ch 2, turn (26 sc) (Place marker 1 in a free front loop from row 12 to mark row).
  • Row 13-16: Sc in each st across; ch 1, turn (26 sc).
  • Row 17: Sc in the FLO of each st across; ch 1, turn (26 sc). (Place marker 2 in a free back loop of row 17 to mark row).

LINING: SIZE G-J HOOK POCKETS

  • Row 18: Sc 11, sc in FLO 15, sc in BLO 15, turn, dc 15, sc 26, turn.
  • Row 19: sc 26, dc 15, turn, dc 14, sc, chain 2, hdc the pocket front and pocket back closed together in next 16 sts, hdc 11, turn.
  • Rows 20-27: (Repeat rows 18 and 19) 4 times.
  • Row 28: CHANGE TO COLOR B, sc in each sc across; ch 1, turn (26 sc).

COVER: BACK

  • Row 29: Sc in BLO of each st across; ch 1, turn. (26 sts) (Place marker 3 in a front loop of row 28 to mark the row.)
  • Row 30-54: Sc in each st across; ch 1, turn. (26 sc)

COVER: SPINE

  • Row 55: Fold cover toward the outside center of the case. Insert hook in the BLO of the first st of row 54 AND through the first free loop of row 17 (marked with marker 2); complete sc. Continue joining the back loops of row 54 and the free loops of row 17 with a sc across; ch 1, turn. (26 sc)
  • Row 56-60: Sc in each st across; ch 1, turn. (26 sc)
  • Row 61: Insert hook in the BLO of the first st of row 60 AND through the first free loop of row 12 (marked with marker 1); complete sc. Continue joining the back loops of row 60 and the free loops of row 12 with a sc across; ch 1, turn. (26 sc)


COVER: FRONT

  • Row 62: Sc in each st across; ch 1, turn. (26 sc) 
  • Row 63-86: Sc in each st across; ch 1, turn. (26 sc) (OPTIONAL: Work the 24-row tapestry crochet colorwork chart in this section, such that Row 63 corresponds to Row 1 of the chart, Row 64 corresponds to Row 2 of the chart, and so forth. Use the intarsia method to save yarn. Also, in order to prevent the stitches from getting taller because of the colorwork, I recommend floating the carried-over strands on the wrong side of the work instead of encasing them in each stitch).
  • Row 87: Fold cover so the edge of row 86 matches the beginning foundation chain. Insert hook thru the beginning foundation chain AND through both loops of row 86; complete sc; continue joining the foundation chain and row 86 across all sts with a sc (26 sc); ch 1, do not fasten off.

EDGING FOR ZIPPER CLOSURE

  • Round 1: With outside cover facing you, sc evenly through both thicknesses of the case along the top of the case to join; sc in each of the free loops of row 29 (marked with marker 3); (OPTIONAL: cut plastic canvas to size of the front and back covers, insert plastic canvas between the cover and lining to add structure); continue joining with sc’s through both thickness along the bottom of the case (this will be along the bottom of the hook pockets); join with a sl st to the FLO of the first sc of Round 1. Place marker 4 in the first back loop of Round 1 to mark the Round.
  • Round 2: (Cover piping) Continue working a sl st in the FLO of each st around; join with a sl st to the first sl st.
  • Round 3: (Zipper facing) Sl st in the first free back loop in the sc’s of Round 1 (marked with marker 4), ch 2, hdc in the back loop of each st around; join with a sl st to the top of the beginning ch 2. Fasten off. Weave in ends. 

FINISHING:

  • Sew zipper to the inside of the zipper facing, having the bottom of the zipper centered at the bottom of the spine.


Tuesday, July 8, 2025

Disney Cruise adult FE cabin gift: Charcuterie board & picnic blanket

Now that our cruise on the Disney Treasure is completed, I can safely post what I gave out as a cabin gift for an adults FE gift exchange without spoiling the surprise.

I ended up giving out a charcuterie board with a picnic blanket.  These were the two variations.


I purchased bamboo boards which already had the laser-burned words and circles at Five Below about a year ago. I do NOT own a laser, so I personalized the boards by hand-burning the Mickey icon using a wood burning kit and heat-resistant gloves. I thought that placing the Mickey in the cheese circle was funny and appropriate🐭🧀.  There are other “easier” methods of wood-burning that replicate the laser look by using a Cricut and chemicals and a heat gun, but I intentionally chose to avoid that method because these items need to be food safe.  

The cotton blankets I found several months ago either at Target, Daiso, or Five Below.  

I tied everything together with the explanatory gift tags, and some cotton twine.  I left a long enough loop of cotton twine to hang the gift off of the FE itself just in case the FE hanger pocket was too small.

I hope everyone who received these gifts enjoyed them!

Sunday, January 26, 2025

Haunted Mansion Tightrope Girl Tapestry

I finally finished making this tapestry last night. It took me 4.5 months to make during my free time, which is not a lot of free time given my typical 60 hours work week. 

I reshaped a wire hanger from the dry cleaner to make a hanging “rod”, which saved me a trip to the store to buy a wooden dowel.

One stretching portrait down.  Three more to go!


In case you are wondering, I followed the crochet pattern “Tightrope girl tapestry crochet pattern” which I purchased from @crochet.or.cry on Etsy after I saw her August 19, 2024 Instagram post.

Wednesday, January 1, 2025

Hello Kitty water bottle sling: Free crochet pattern

My sister-in-law mentioned during our Christmas get-together that my niece needs a water bottle sling to take with her on school field trips and asked if I would make one for her.


Given that my niece likes Hello Kitty, rainbows, and pink, I ended up designing and making this for her.  It’s also got a square pocket in front to carry a snack bar or whatever else she wants.

Here’s how I made it:


HELLO KITTY SQUARE POCKET

1. (White) ch5, sc in 2nd ch from hook, sc in remaining 3 sts —4 sts.

2. Ch 1, 2sc in base of 1st ch st from prior round, sc in next 2 sts, 2sc in next 2 sts, sc in next 2 sts, 2sc in next st, sl st to 1st sc of this round — 12 sts.

3. ch1, turn, 2sc in 2nd st from hook, (2sc in next st, sc in next st) x 5, sl st to 1st sc of current round —18 sts.

4. ch1, turn, 2sc in 2nd st from hook, (2sc in next st, sc in next 2 sts) x 5, sl st to 1st sc of current round  —24 sts.

5. ch1, turn, 2sc in 2nd st from hook, sc in next st, 2sc in next st, sc in next 6 sts, (2sc in next st, sc in next st) x 2, 2sc in next st, sc in next 8 sts, 2 sc in next st, sc in next st, sl st to 1st sc of current round —30 sts.

6. ch1, turn, 2sc in 2nd st from hook, sc in next 2 sts, 2sc in next st, sc in next 8 sts, 2sc in next st, sc in next st, 2 sc in next st, sc in next 2 sts, 2sc in next st, sc in next 10 sts, 2 sc in next st, sc in next st, sl st to 1st sc of current round —36 sts.

7. ch1, turn, 2sc in 2nd st from hook, sc in next 2 sts, 2sc in next st, sc in next 10 sts, 2sc in next st, sc in next 2 sts, 2sc in next st, sc in next 2 sts, (EAR = sl st in next st, hdc in next st, ch 1, dc in same st as hdc, ch 1, tc in next st, ch 1, dc in next st, ch 1, hdc in same st as dc, sl st in next st), sc in next 4 sts, ear, sc in next 2 sts, switch yarn to outline color (black), sl st to 1st sc of this round (pulling the new color through) — 52 sts.

8. Continuing with outline color (black): ch1, turn, 2sc in 2nd st from hook, sc in next 2 sts, skip sl st, sc in next 4 sts, 3sc in next st (mark middle/2nd stitch), sc x in next 4 sts, skip sl st, sc in next 4 sts, skip sl st, sc in next 4 sts, 3sc in next st, sc in next 4 sts, skip sl st, sc in next 2 sts, 2sc in next st, sc in next 2 sts, 2sc in next st, sc in next 14 sts, 2 sc in next st, sc in next 2 sts, sl st to 1st sc of this round; bind off —56 sts.

9. (PINK) Turn/Hold face so marked ear is on the right if you’re right-handed, on the left if you’re left-handed. Starting at tip of ear, put hook through marked st of previous round, yo and pull loop through, ch 2, 2hdc in same st, hdc in next 4 sts, dc in next 6 sts, hdc in next 4 sts, 3 hdc in next st, hdc in next 5 sts, sc in next 6 sts, hdc in next 2 sts, 2dc in next st, 3tc in next st, 2dc in next st, dc in next st, hdc in next 6 sts, dc in next st, 2 dc in next st, 3 tc in next st, 2 dc in next st, hdc in next 2 sts, sc in next 6 sts, hdc in next 6 sts (6th hdc is in same st as 1st hdc of this round), sl st to 1st hdc of current round.

10. Don’t turn. Ch 3 (counts as 1 dc st), 2 dc in same st, dc in next 15 sts, 3 dc in next st, hdc in next st, sc in next 12 sts, hdc in next 4 sts, 3 dc in next st, hdc in next 15 sts, 3 dc in next st, hdc in next 4 sts, 12 sts, hdc in the same st as 1st dc of this round, sl st to 1st dc of current round, bind off.


11. Embroider the eyes, nose, and whiskers according to a reference photo of Hello Kitty which I found on Google.  (TIP: I put the reference photo onto my iPad so that I could pinch/zoom the image size to match the size of the crochetted blank face. Then by holding the crochetted blank face in front of the iPad photo, and quickly peaking behind it, I could get an estimate of where to place each facial feature.)

12. Make PINK bow by Repeating row 1-3, and continue until width of desired bow is reached. Bind off leaving a 12-inch tail. Fold the oval in half horizontally. Using the tail, wrap yarn tightly around the center of the bow several times to cinch it. Tie a knot. Using the remaining tail yarn, sew bow to the Hello Kitty face to match the reference photo.


WATER BOTTLE HOLDER 

1. (DARK PINK) Magic Ring, 6 sc in Magic ring — 6 sts.

2. Increase 6 sts each round. Make 6 rounds. Sl st to 1st st of final round and change yarn color. 

3.  Sc in same st as the sl st, *(skip 2 sts, 5 tc in next st, skip 2 sts, sc in next st), repeat from * to the end of the round. Change yarn color.

4. Ch 4 (counts as tc), 2 tc in same st as 1st st, *(skip 2 sts, 5 tc in next st, skip 2 sts, sc in next st), repeat from * until 3 sts from end of round, skip 2 sts, 2 tc in next st, sl st to 1st st of this round. Change yarn color.

5. Repeat the prior 2 rounds until the desired height of the sling is reached. Change yarn color.

6. (DARK PINK) If the prior round ended in a sl st: Ch 4 (counts as tc), dc, hdc, *(sc, hdc, dc, tc, dc, hdc), repeat from * until 3 sts from end of round, sc, hdc, dc, sl st to the 1st st of this round, then proceed to the next round.  If the prior round ended in a sc: hdc, dc, tc, dc, hdc, *(sc, hdc, dc, tc, dc, hdc), repeat from * the end of round, sl st to the 1st st of this round.

7. Ch 1, sc in same st as ch st, sc all around, sl st to 1st st. Bind off.

8. Sew the square pocket to WATER BOTTLE HOLDER to make a patch pocket.


STRAP

1. On desired area of the top border, insert hook, yo, pull through yarn, ch 2, hdc in same st, hdc in the next 5 sts, ch 2, turn.

2. hdc in the next 6 sts, ch 2, turn.

3. Repeat rows until desired length of strap is reached. Ch 1, turn.

4. Sl st all 6 sts. Bind off.


Saturday, January 6, 2024

Valet Tray: FREE pattern & printable gift tag


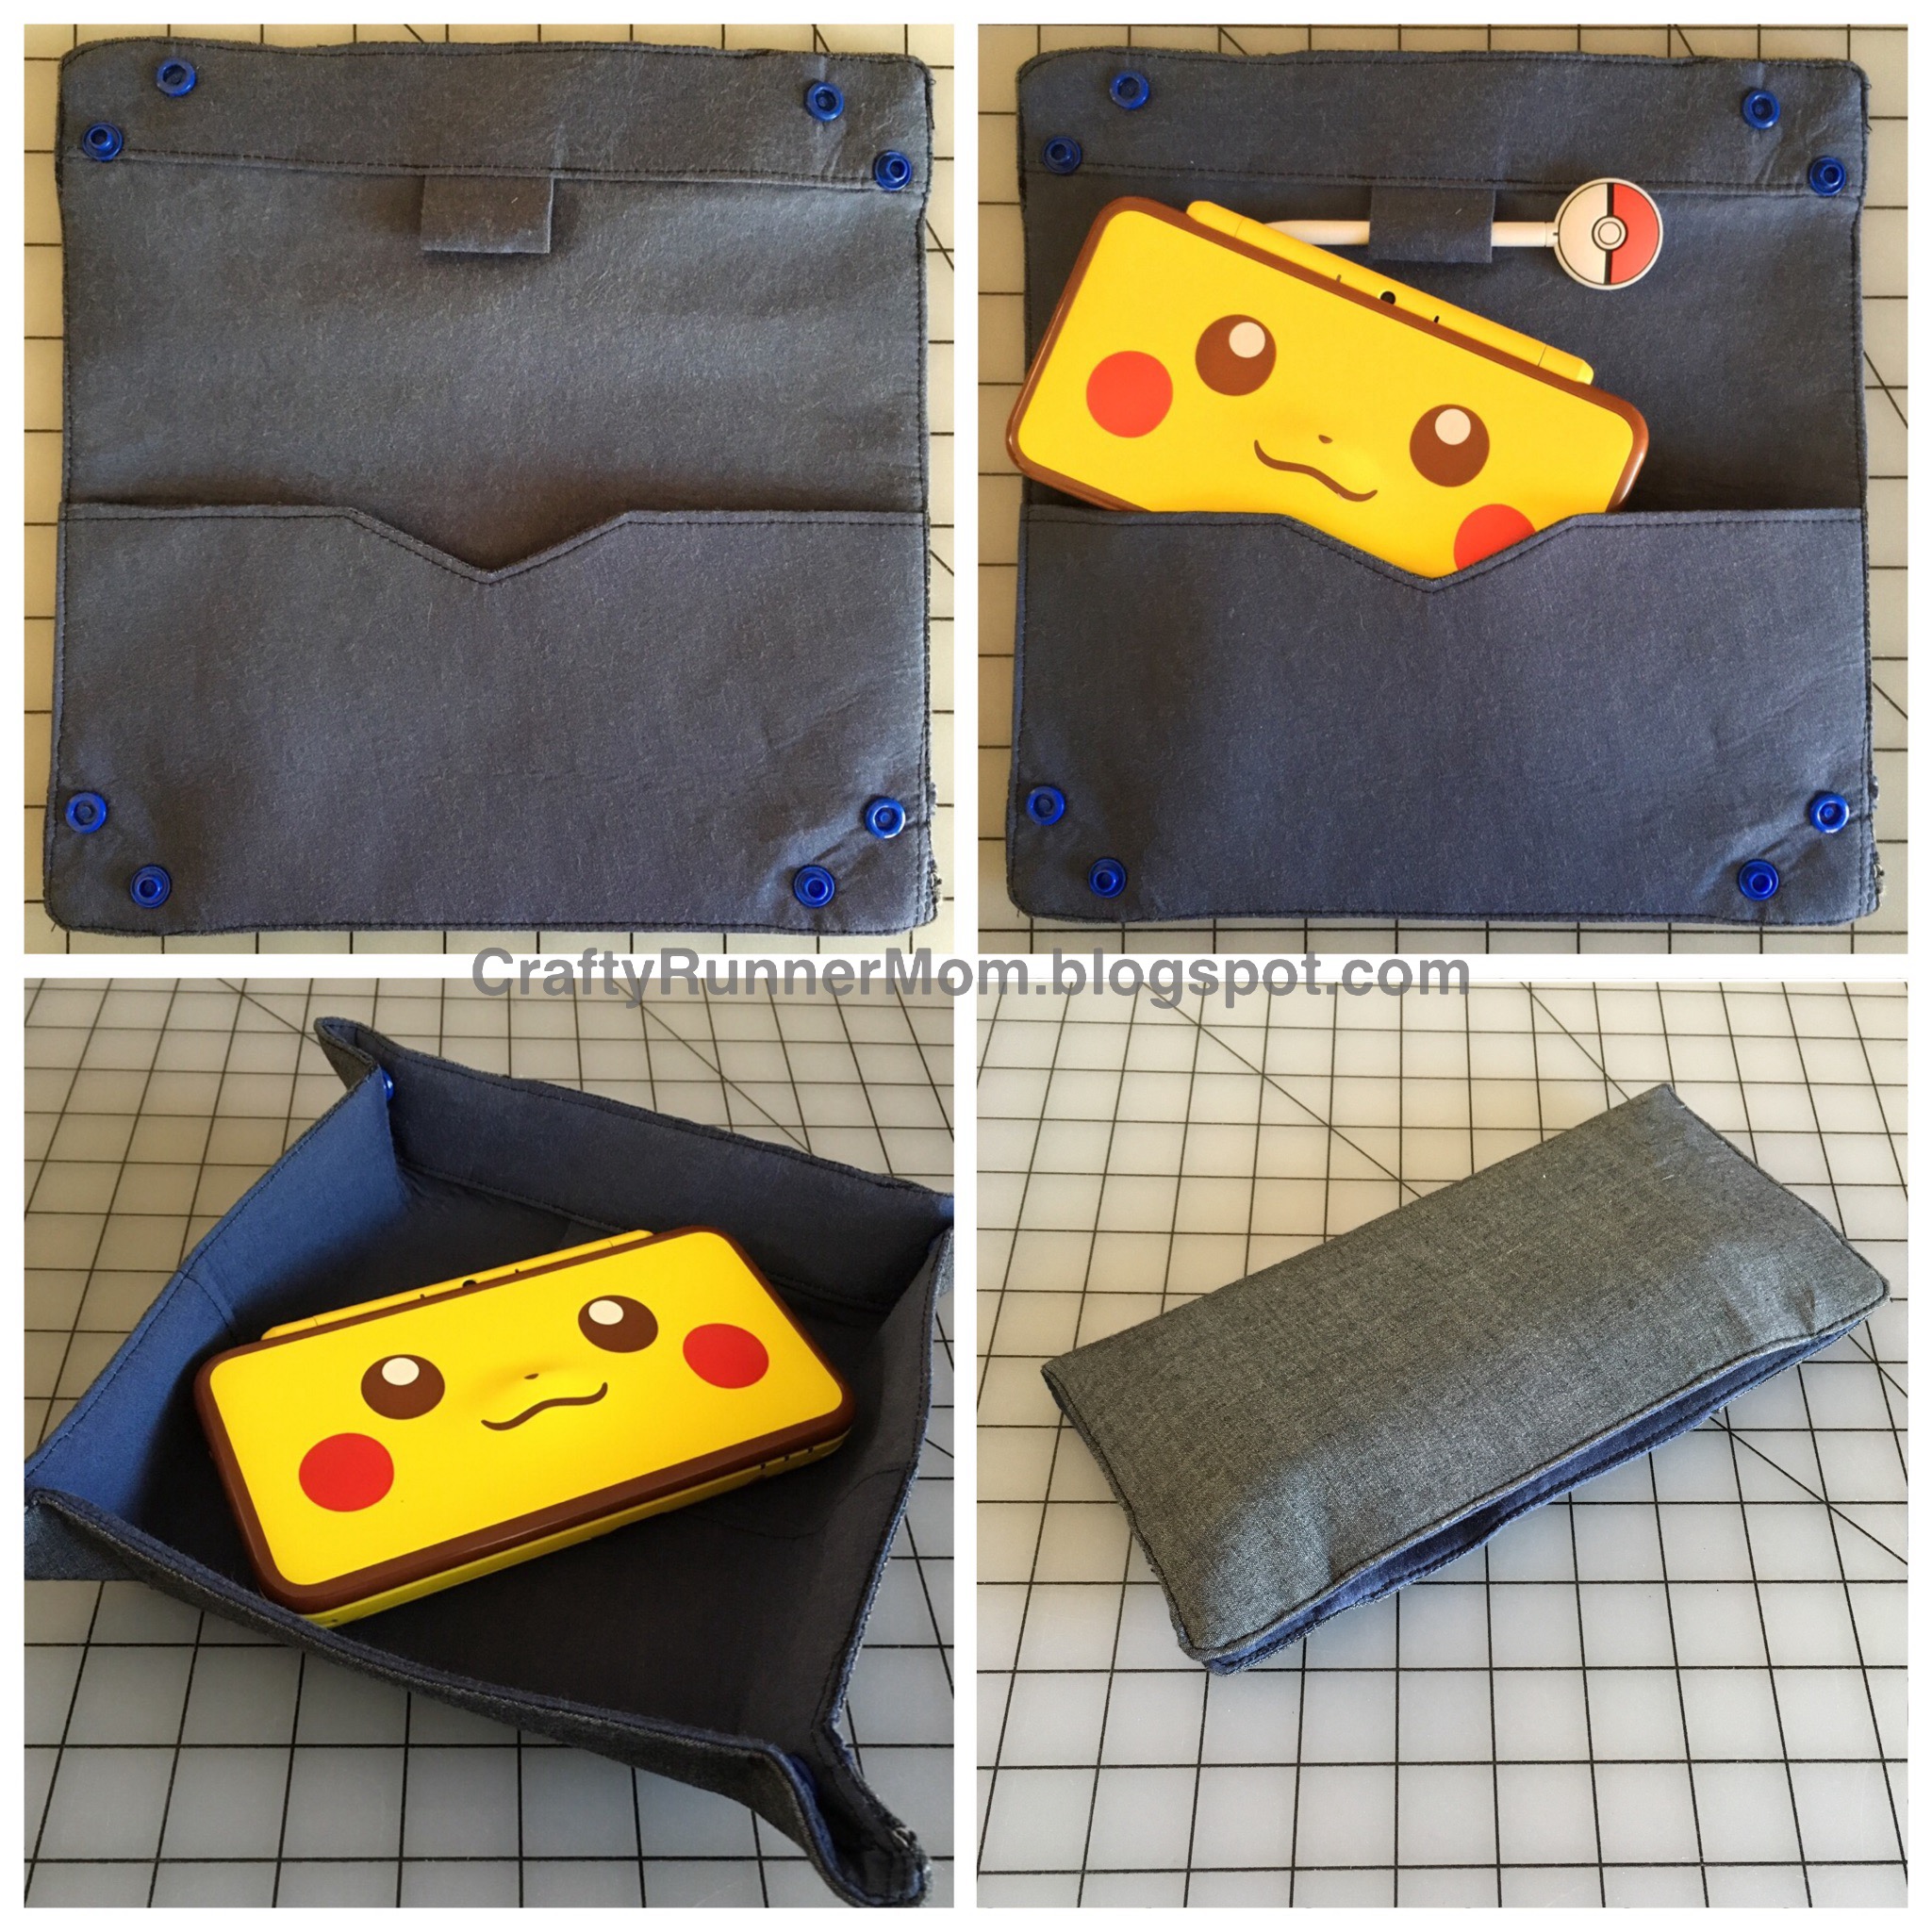
On a recent Disney cruise, I participated in a Fish Extender (FE) gift exchange. One of the gifts that I gave out were fabric valet trays. They are one of my favorite gifts to give because they are so useful, so portable, and are easy to make.


Here are instructions on how to make a simple valet tray yourself:
  1. Cut two 10”x10” squares from fabric.
  2. Cut two 9.5”x9.5” squares from fusible interfacing. Alternatively use just one square of fusible fleece.
  3. Iron the interfacing to the wrong side of the fabric squares, making sure it’s centered.
  4. With right sides facing, using a half-inch seam allowance, sew along all 4 sides but leave a 5” space open on one side.
  5. Turn the item right side out using the opening from Step 4.
  6. Top stitch the opening and then around all 4 sides of the square.
  7. Stitch “fold lines”1.5” in from the outside edge. Do this on all 4 sides.
  8. Attach a pair of KAM snaps to each of the 4 corners.
  9. Voila! Ready to gift or use!
Any fabric can be used, and you can customize it any way you want. You can even use up your scraps to make a crazy log cabin patchwork tray. This is one that I gave to my Mom for Christmas a few years ago, made from upcycled courduroy pants.


Another customization that I made a few years ago was to make a complex version that converted into an envelope clutch.  I made this by eliminating the sewn “fold lines”, adding a slip pocket, adding a pen loop, and making sure that the KAM snaps matched when folding the clutch in half. 

I typically gift these trays with a gift tag that says:
“This versatile valet tray is a solution for organizing personal items like wallets, keys, watches, and jewelry, effortlessly decluttering your bedside table, desk, or countertop. It’s designed for portability — snap the corners to assemble the tray; unsnap the corners to flatten it for easy travel or storage. Also great as a dice rolling tray for game night!”

To make things easy for you, here is a printable set of 6 gift tags that you can print out onto an 8.5”x11” sheet of paper:


Saturday, December 2, 2023

Disneyland Magic Key Holder Tote Bag: DIY Upgrade

I upgraded my 2023 Disneyland Magic Key holder tote bag with a bit of sewing: (1) added interfacing for structure, (2) added a lining, (3) boxed the corners, and (4) added a zipper. Now it can stand up on its own, and I feel safer knowing that the zipper will prevent stuff from accidentally falling out! Plus, I think it looks better than the original!

In 2022 and 2023 during the holidays, one of the perks that Disneyland gave to their Magic Key Holders (a.k.a. annual pass holders) was giving out Magic Key Holder exclusive tote bags.

In 2022, it was a reusable plastic shopping bag.


In 2023, it was a smaller fabric tote bag. But being fabric, it was already nicer and much appreciated.


However after receiving it, I realized how thin and flimsy the fabric was, and how it didn’t really feel nice when carrying stuff in it. I wanted to be able to carry it around like a purse. So with a bit of sewing, I upgraded it. Here’s how I did it: 

  1. I unpicked the folded top seam and detached the bag handles. From this point onward, I will refer to the original bag as the shell. 
  2. I measured the height and width of the shell.  Then I cut out two pieces of felt and two pieces of lining fabric in those same dimensions.
  3. I sewed the lining pieces right side together on 3 side, leaving the top open. 
  4. I repeated Step 3 on the felt pieces.
  5. With right sides facing each other, I marked a 2-inch square at each bottom corner of the lining, and then boxed the corners.
  6. I repeated step 5 on the felt layer and the shell.
  7. Turned the shell right side out. Turned the felt layer and lining wrong sides out.
  8. Inserted the felt layer (which will serve as interfacing) inside the shell.
  9. Inserted the lining inside the felt layer.
  10. Folded the top hem of shell down. 
  11. Tucked both edges of a16-inch zipper underneath the folded shell hem. Pin in place.
  12. Pin the handle straps into place onto the shell, making sure to tuck the strap ends underneath the folded shell hem.
  13. Sew along the top and bottom edges of the folded hem.
Voilà! 

Sunday, October 29, 2023

FREE PATTERN: DIY Toy Story Aliens Fish Extender for a Disney Cruise

A good friend of mine will be sailing on her first Disney Cruise and she’ll be participating in the FE gift exchange too. She asked me to make her a Fish Extender. So when I was brainstorming designs for her FE, I remembered that she loves the aliens from Toy Story, aka. the Little Green Men, or “LGM” as she calls them. And that’s how I was inspired to make an LGM fish extender.

First I designed a 2D mockup of the fish extender to figure out the proportions. This is what I came up with.


I used the same pattern that I used for my DCL Ship-inspired Fish Extender but I modified it to make the pockets shorter to keep the proportions of the LGM uniform. Below is the modified pattern that I created & used.

  • Pieces A & B form the back of the pocket. Make 2 of each.
  • Pieces C & G are the pocket lid and bottom respectively. Make 2 of each.
  • Pieces D, E, & F when stitched together are the front of the pocket. Make 2 of each.

I used felt, 16-inch zippers, paracord, and a chopstick (the hanging rod) that I already had in my crafting supplies. I stitched everything together using a 0.5” seam allowance.

ASSEMBLY:

  1. Cut facial features out of felt. Appliqué the felt facial features to both A pieces. Make sure to keep clear of the 0.5” seam allowance. 
  2. Mark the center of F. Mark the center of the arch of G. Pin F to the curved edge of G, right sides together, making sure that the centers are aligned. Sew together.
  3. Mark the center of D and zipper. Align centers and sew right sides together.
  4. Mark the center of the arch of C. Pin zipper from Step 2 to the curved edge of C, right sides together, making sure that the centers are aligned. Sew together.
  5. Pin G to B right sides together, with straight edge of G aligned to bottom of B.  Sew together.
  6. Place wrong side of C facing right side of B, with straight edge of C aligned with top edge of B. Align bottom of A to straight edge of C with right side facing. Sew all 3 layers together.
  7. Repeat Steps 2-4 with the second pieces. 
  8. Place right side of the 2nd piece of G facing right side of A, with straight edge of G aligned with top edge of A. Align bottom of 2nd piece of B to straight edge of G with right side of B facing wrong side of G. Sew all 3 layers together.
  9. Place wrong side of 2nd piece of C facing right side of B, with straight edge of C aligned with top edge of B. Align bottom of A to straight edge of C with right side facing. Sew all 3 layers together.
  10. Cut out felt planet badge and appliqué to both E pieces.
  11. With wrong sides facing, sew bottom of D to top of E.  Repeat with second piece of E to the second piece of D.
  12. With wrong sides facing, sew top of F to bottom of E.  Repeat with second piece of E to the second piece of F.
  13. Fold the right edge of the pocket front as if to make a hem, and sew that folded hem to the right edge of B. Repeat on left edge of pocket.
  14. Repeat Step 13 for the 2nd pocket.
  15. Sew a 2 inch strip of fabric to the back top edge of the hanger. This will be the channel for the hanging rod.  Cut two 0.5” squares from that rod channel about 1 inch from the side edges of the fish extender hanger.
  16. Insert wooden rod or chopstick into the hanging rod channel. Feed paracord thru one of the 0.5” squares and tie it around the wooden rod.  Feed the other end of the paracord thru the 0.5” squares and tie it around the wooden rod.
  17. Sew the right and left edges of the channel shut to prevent the rod from slipping out.

The completed pockets are a semi-circle basket so that they can hold more stuff. They also have a zipped lid for added security. 

The LGM MagicBand+ fits with lots of room to spare.

The planet patches can also be customized with interchangeable name buttons (not shown) for each person.  And then when my friend isn’t on a cruise, she can remove the buttons and use this in her home as a hanging organizer.


Sunday, October 15, 2023

Disney Cruise Inspired Cricut Beverage Stencils: DIY Fish Extender Gift for Adults

I’ve been searching the Internet, Pinterest, and Facebook trying to find inspiration for a DIY adult fish extender gift for a Disney cruise. And then I stumbled upon two photos. The first photo reminded me that Cove Cafe onboard the Disney Cruise ships places fun images on your beverages. The other photo showed me a thin plastic beverage stencil.


It’s brilliant! A Cricut could be used to cut a 4-inch diameter stencil from a plastic sheet, like a thin cutting board or placemat from the dollar store. 

Then I would have several gifting options:
1. Gift a package of 3-4 different character stencils in the same package (e.g. Mickey, Castle, Winnie the Pooh, DCL logo, etc)
2. Gift one stencil with an empty shaker for the powdered condiment
3. Gift one stencil with a mug.

Since the stencil can be used to decorate more than just coffee, I came up with this instruction sheet that names ALL of the Disney Cruise Line ships, including the names of 2 out of the 3 ships that haven’t yet been launched (as of the time of this blog post). {UPDATE: Disney Cruise line revealed on 3/20/2024 that the name of their 3rd triton class ship is the Disney Destiny which will set sail in 2025, so I’ve edited the text below to include its name.}

Culinary ADVENTURE is out there! It’s your DESTINY to bring home the WONDER of Disney Cruise Line's Cove Cafe and add MAGIC to any beverage/food item with this stencil. Use this stencil to decorate smoothies, milkshakes, coffee, hot cocoa, sugar cookies, cupcakes, pancakes, omelettes, or whatever you can DREAM up! Just hover the stencil above the item & sprinkle whatever powdered spice you WISH: sugar, cocoa, cinnamon, paprika, etc. Voila! It's a pixie-dusted FANTASY that any home cook would TREASURE. Hand wash only.


Perhaps it would be fun to package it with an instruction sheet that looks like the Cove Cafe menu.


I haven’t decided yet for sure if I’m going to give this as a FE gift or not. But I’m definitely saving this idea for the future.


Friday, April 14, 2023

FREE PATTERN: DIY Lounge Chair Towel Holders for a Disney Cruise


When we sailed on Disney Cruise Lines with some friends in September 2022, I made these personalized lounge chair towel holders/chair toppers/chair covers for us.  It made it so easy to find our chairs amongst a sea of lounge chairs!


How did this all start? Well, after watching the “Life Well Cruised” YouTube Channel, I discovered that towel bands were the solution to the problems of beach towels (1) blowing away in the wind and (2) slipping off the top of a lounge chair.  So I bought some towel bands on Amazon in June 2022.  They were VERY useful & I could see why the vlogger said they were one of the top 10 things to bring on a cruise. 


Later that same summer, while I was in the midst of making some personalized matching shirts for our families, it hit me.  I could also make personalized lounge chair towel holders!  My only complaint with the towel bands that I purchased is that they are too narrow to personalize. So I made these chair toppers/chair covers instead.


These are the matching polo shirts that I made.
I drew the family name logos myself by hand (I did NOT use a font)
and digitized them to use with my Cricut.

I purchased a yard of blue and a yard of red swimsuit fabric, also known as “Performance Nylon & Spandex Fabric” from JoAnn Fabrics.  I cut each yard of fabric according to the schematic below:

This yielded 6 rectangles for each color.


I used a “stretch twin machine needle” with a straight stitch on my sewing machine (I don’t own a serger) to sew it all up with a 0.5” seam allowance.

  1. For each individual rectangle, I folded them in half to make a 9”x19” rectangle as shown by the dotted lines in the schematic.
  2. I sewed the short edges shut, and then boxed the top corners about 0.25” deep.
  3. I then folded & hemmed the bottom edges.

The finished dimensions are about 18” wide x 8.5” tall.


I mixed acrylic paint mixed with “fabric medium” to make my own DIY fabric paint. Then I used the fabric paint with the “freezer paper stencil” technique to apply the image that I had previously designed for our personalized shirts.  I prefer to use fabric paint instead of heat transfer vinyl (HTV) on all of my Cricut projects because: (1) Fabric paint can withstand many wash-and-machine-dry cycles without peeling off. (2) Instead of peeling, the fabric paint stretches and cracks in the same manner as vintage T-shirts. In contrast, HTV has limited stretch. (3) I don’t have to worry about an iron melting synthetic fabrics to apply the HTV image to the fabric. This was especially important because the fabric that I used to make the towel holders is synthetic.


To use the towel holders, we folded the beach towel over the top of the lounge chair, and then slipped a towel holder over the top of the chair to prevent the towel from blowing away or falling down. Even though these were made for a Disney Cruise vacation, we can use them for other future vacations or anytime when we’re at a pool or beach! Plus, whenever we use them, it will bring back fond memories of good times with friends!


UPDATE: These would make great Disney Fish Extender FE gifts.  Except I wouldn’t personalize them. It took way too long to design each family name to look like the cruise ship logos. If you want to make these yourself for FE gifts, here’s a FREE PRINTABLE sheet that has 6 name tags.


For links to other crafts that I made for a Disney Cruise, check out:


Saturday, December 24, 2022

FREE KNITTING PATTERN: “Willow” Disney+ TV Series Green Hooded Wrapped Shawl Scarf

Elora Danan’s Green Hooded Wrapped Shawl Scarf from the “Willow” Disney+ TV Series: FREE KNITTING PATTERN

by CraftyRunnerMom

(Please note: This pattern is a fan recreation based off of prop photos taken of the original costume that was on display at the D23 Expo. That original costume was designed by Sarah Young. I am in no way affiliated with the Disney Company, Disney+, or the Willow series production staff. This pattern is for personal recreational purposes only.)


The moment I saw the first episode of the “Willow” TV Series on Disney+, I was struck by how interesting Elora Danan’s (a.k.a. Dove, Brunhilde) quest outfit was, particularly her hooded wrapped shawl. So I decided to embark on my own quest to make a replica. 


Abbreviations

st = stitch
sts = stitches
BO = bind off
CO = cast on
M1K = make 1 stitch knit-wise
M1P = make 1 stitch purl-wise
PM = place marker
K2tog = knit 2 stitches together decrease
P2tog = purl 2 stitches together decrease


MATERIALS:

Knitting needles (US Size 8, 5.0 mm) 
Worsted weight yarn (about 1719.8 yards or 1572.6 meters***)

*** Your individual yardage may vary depending on your scarf length and torso size.  You can use this Yardage Calculator and the gauge below to calculate your estimated yardage.


GAUGE:

18 rows = 10 cm fabric 

24 sts of 1:1 rib = 10 cm fabric = 68.5 cm yarn 

26 sts of 2:2 rib = 10 cm fabric = 75 cm yarn 

38 sts of 1:1 rib = 16 cm fabric = scarf section width

76 sts in 2:2 rib = 26.25 cm fabric = torso section width


MEASUREMENTS GUIDE: 

To make this a custom fitted piece, you need to take a few measurements of your body:
  • Distance between shoulder to ankle (or wherever you want the scarf to end). Subtract 30 cm from that distance to equal the SCARF LENGTH.  (NOTE: 30 cm is the length of the transition section where the 1:1 rib increases into 2:2 rib).
  • Circumference of upper arm from armpit to shoulder. That circumference will be used to calculate two numbers.  ARM HOLE TOP LENGTH = 1/3 x circumference.  ARM HOLE BOTTOM LENGTH = 2/3 x circumference. 
  • Circumference around torso underneath breasts.  (If you want your garment to fit tighter, subtract a few inches/cm to provide negative ease.)  Divide this circumference in half to equal the TORSO FRONT LENGTH.  
  • TORSO BACK LENGTH = TORSO FRONT LENGTH minus ARM HOLE BOTTOM LENGTH.
  • Distance from outer corner of left shoulder to top of head to outer corner of right shoulder. This is the HOOD LENGTH.  (Depending upon how much drape you want the hood opening to have, you can make this longer or shorter).


UPDATED 2/25/2023:

I really wanted this pattern to be size inclusive, so that’s why it’s been challenging to come up with a “one size fits all” formula. 

If you find that the above formulas make the torso back section too short, here are a few alterations to the pattern that you can make: 

  1. The garment arm hole has a lot of stretch, so make sure that when you measure your arm circumference you pull the measuring tape snug. If this doesn’t work, you can try any or all the following 3 alteration options.
  2. Multiply your real arm circumference by 0.75 and use that new number as the new arm circumference. This will create negative ease.
  3. Switch to the following new formulas to calculate the arm hole top and bottom lengths: ARM HOLE TOP LENGTH = 2/5 x arm circumference.
    ARM HOLE BOTTOM LENGTH = 3/5 x arm circumference. The downside to this alteration is that the shoulders may be more droopy.
  4. Use the following new formula to calculate the torso back: TORSO BACK LENGTH = 1/2 x TORSO FRONT LENGTH. This is probably the easiest alteration. The only downside is that the ends of the scarf section may hang a little longer on the finished garment.

The garment is knit in two pieces, and seamed together at the neck. The main section is knit side-to-side, starts with a 1:1 rib that transitions to 2:2 rib, and uses short-rows to make armholes. Below is a schematic of how the garment is constructed.
hooded shawl construction schematic

PATTERN:

  1. FIRST SHOULDER SCARF: CO 38 sts in 1:1 rib pattern, turn.
  2. * K1 P1, repeat from * until end of row, turn.
  3. Repeat Step 2 until reach SCARF LENGTH (see measurements guide above).
  4. INCREASE ROW: (K1 P1 K1 P1 K1 P1 M1K) x 3 times, K1 P1, (M1K K1 P1 K1 P1 K1 P1) x 3 times, turn.
  5. (K1 P1 K1 P1 K1 P2) x 3 times, K1, (P2 K1 P1 K1 P1 K1) x 3 times, P1, turn.
  6. K1, (P1 K1 P1 K1 P1 K2) x 3 times, P1, (K2 P1 K1 P1 K1 P1) x 3 times, turn.
  7. Repeat Steps 5-6 for the next 6 rows.
  8. INCREASE ROW: (K1 P1 K1 P1 K1 M1K P2) x 3 times, K1, (P2 M1K K1 P1 K1 P1 K1) x 3 times, P1, turn.
  9. K1, (P1 K1 P1 K1 P2 K2) x 3 times, P1, (K2 P2 K1 P1 K1 P1) x 3 times, turn.
  10. (K1 P1 K1 P1 K2 P2) x 3 times, K1, (P2 K2 P1 K1 P1 K1) x 3 times, P1, turn.
  11. Repeat Steps 9-10 for the next 6 rows.
  12. INCREASE ROW: K1, (M1P P1 K1 P1 K1 P2 K2) x 3 times, M1P P1, (K2 P2 K1 P1 K1 M1P P1) x 3 times, turn.
  13. (K2 P1 K1 P1 K2 P2 ) x 3 times, K2, (P2 K2 P1 K1 P1 K2) x 3 times, P1, turn.
  14. K1, (P2 K1 P1 K1 P2 K2) x 3 times, P2, (K2 P2 K1 P1 K1 P2) x 3 times, turn.
  15. Repeat Steps 13-14 for the next 6 rows.
  16. INCREASE ROW: (K2 P1 M1P K1 P1 K2 P2) x 3 times, K2, (P2 K2 P1 K1 M1P P1 K2) x 3 times, P1, turn.
  17. K1, (P2 K2 P1 K1 P2 K2) x 3 times, P2, (K2 P2 K1 P1 K2 P2) x 3 times, turn.
  18. (K2 P2 K1 P1 K2 P2) x 3 times, K2, (P2 K2 P1 K1 P2 K2) x 3 times, P1, turn.
  19. Repeat Steps 17-18 for the next 6 rows.
  20. INCREASE ROW: K1 M1K, (P2 K2 P1 M1K K1 P2 K2) x 3 times, P2, (K2 P2 K1 M1K P1 K2 P2) x 3 times, turn.
  21. (K2 P2 K1 P2 K2 P2) x 3 times, K2, (P2 K2 P2 K1 P2 K2) x 3 times, P2, turn.
  22. K2, (P2 K2 P1 K2 P2 K2) x 3 times, P2, (K2 P2 K2 P1 K2 P2) x 3 times, turn.
  23. Repeat Steps 21-22 for the next 6 rows.
  24. INCREASE ROW: (K2 P2 K1 M1K P2 K2 P2) x 3 times, K2, (P2 K2 P2 M1K K1 P2 K2) x 3 times, P2, turn.
  25. FIRST TORSO FRONT: * K2 P2, repeat from * until end of row, turn.
  26. Repeat Step 25 until reach TORSO FRONT LENGTH. PM on the final st to indicate that this edge is the “neck border” of the fabric.
  27. FIRST ARM HOLE: K2 P2 rib for 28 sts, PM on 29th st and place that st and the remaining sts of the row on hold, turn. There should be 48 sts on hold. 
  28. TOP SECTION OF ARM HOLE: K2 P2 rib for 28 sts, turn.
  29. Repeat Step 28 until reach ARM HOLE TOP LENGTH. Make note of how many rows were needed. Then place these 28 sts on hold.
  30. BOTTOM SECTION OF ARM HOLE: Using a new strand of yarn & beginning with the marked hold st from Step 27: K2 P2 rib for 48 sts, turn.
  31. Repeat K2 P2 rib rows until reach the ARM HOLE BOTTOM LENGTH, turn.
  32. REJOINING ROW: K2 P2 rib for 76 sts, thus closing the arm hole. Turn.
  33. TORSO BACK: If the final st of Step 32 is on the “neck border” of the fabric (as marked in Step 26), K2 P2 rib for 76 sts, turn. If the final st of Step 32 is on the opposite border of the “neck border” of the fabric, SKIP to Step 34.
  34. SHORT ROW: K2 P2 rib for 58 sts, place the remaining 18 sts on hold, turn.
  35. Slip 1st st purlwise, P1, K2 P2 rib to end of row, turn.
  36. For the next 4 rows: K2 P2 rib for 76 sts, turn.
  37. SHORT ROW: K2 P2 rib for 64 sts, place the remaining 12 sts on hold, turn.
  38. Slip 1st st knitwise, K1, P2, then K2 P2 rib to end of row, turn.
  39. For the next 4 rows: K2 P2 rib for 76 sts, turn.
  40. Repeat Steps 34-39 until the “waist border” reaches the length that’s the TORSO BACK LENGTH.  Because of the short rows in Steps 34 & 37, the “neck border” will be shorter than the “waist border”. 
  41. If the final st of Step 40 is on the “neck border” of the fabric (as marked in Step 26), SKIP to Step 42. If the final st is either in the middle of the fabric or on the “waist border” of the fabric, K2 P2 rib to the end of the row until the final st is on the “neck border, turn.
  42. SECOND ARM HOLE: Repeat Steps 27-32 to make the SECOND ARM HOLE.
  43. SECOND TORSO FRONT: * K2 P2, repeat from * until end of row, turn.
  44. Repeat Step 43 until reach same number of rows as Step 26.
  45. SECOND SHOULDER SCARF: DECREASE ROW: (K2 P2 K2tog P2 K2 P2) x 3 times, K2, (P2 K2 P2 K2tog P2 K2) x 3 times, P2, turn.
  46. K2, (P2 K2 P1 K2 P2 K2) x 3 times, P2, (K2 P2 K2 P1 K2 P2) x 3 times, turn.
  47. (K2 P2 K1 P2 K2 P2) x 3 times, K2, (P2 K2 P2 K1 P2 K2) x 3 times, P2, turn.
  48. Repeat Steps 46-47 for the next 6 rows.
  49. DECREASE ROW: K2tog, (P2 K2 P1 K2tog P2 K2) x 3 times, P2, (K2 P2 K2tog P1 K2 P2) x 3 times, turn.
  50. (K2 P2 K1 P1 K2 P2) x 3 times, K2, (P2 K2 P1 K1 P2 K2) x 3 times, P1, turn.
  51. K1, (P2 K2 P1 K1 P2 K2) x 3 times, P2, (K2 P2 K1 P1 K2 P2) x 3 times, turn.
  52. Repeat Steps 51-52 for the next 6 rows.
  53. DECREASE ROW: (K2 P2tog K1 P1 K2 P2) x 3 times, K2, (P2 K2 P1 K1 P2tog K2) x 3 times, P1, turn.
  54. K1, (P2 K1 P1 K1 P2 K2) x 3 times, P2, (K2 P2 K1 P1 K1 P2) x 3 times, turn.
  55. (K2 P1 K1 P1 K2 P2 ) x 3 times, K2, (P2 K2 P1 K1 P1 K2) x 3 times, P1, turn.
  56. Repeat Steps 54-55 for the next 6 rows.
  57. DECREASE ROW: K1, (P2tog K1 P1 K1 P2 K2) x 3 times, P2tog, (K2 P2 K1 P1 K1 P2tog) x 3 times, turn.
  58. (K1 P1 K1 P1 K2 P2) x 3 times, K1, (P2 K2 P1 K1 P1 K1) x 3 times, P1, turn.
  59. K1, (P1 K1 P1 K1 P2 K2) x 3 times, P1, (K2 P2 K1 P1 K1 P1) x 3 times, turn.
  60. Repeat Steps 58-59 for the next 6 rows.
  61. DECREASE ROW: (K1 P1 K1 P1 K2tog P2) x 3 times, K1, (P2 K2tog P1 K1 P1 K1) x 3 times, P1, turn.
  62. K1, (P1 K1 P1 K1 P1 K2) x 3 times, P1, (K2 P1 K1 P1 K1 P1) x 3 times, turn.
  63. (K1 P1 K1 P1 K1 P2) x 3 times, K1, (P2 K1 P1 K1 P1 K1) x 3 times, P1, turn.
  64. Repeat Steps 62-63 for the next 6 rows.
  65. DECREASE ROW: K1, (P1 K1 P1 K1 P1 K2tog) x 3 times, P1, (K2tog P1 K1 P1 K1 P1) x 3 times, turn.
  66. * K1 P1, repeat from * until end of row, turn.
  67. Repeat Step 66 until reach same number of rows as Step 3.
  68. BO 38 sts in 1:1 rib pattern.
  69. HOOD: CO 56 sts in 2:2 rib pattern. Turn.
  70. * K2 P2, repeat from * until end of row, turn.
  71. Repeat Step 70 until reach HOOD LENGTH.
  72. BO 56 sts in 2:2 rib pattern.
  73. Fold hood in half, then stitch together the back seam of hood.
  74. ASSEMBLING THE GARMENT: PM on the center back of the neckline (see the illustrated schematic for reference). 
  75. Align the center of the hood with center neckline.
  76. Stitch hood to the back of the torso section.
  77. Weave in yarn tails.

HOW TO WEAR THE GARMENT: 

  1. Place both arms into the garment similar to putting on a sweater.
  2. Wrap the left scarf section across the front of your torso, draped above your right shoulder (pull it snug so that the decrease row rests behind your right shoulder), and thru the armhole.
  3. Then drape the right scarf portion over the front of your torso and over your left shoulder (pull it snug so that the decrease row rests behind your left shoulder).