Showing posts with label Disney. Show all posts

Tuesday, June 14, 2016

#DisneyxCoach collaboration launches June 17!

Wow, Disney fans around the world will have A LOT to celebrate on June 17!  

First is the official grand opening of Shanghai Disneyland.  

Second is the premiere of Pixar's Finding Dory movie.  

And now fashion fans have the #DisneyxCoach limited edition capsule collection to look forward to. 


Mixing the irreverent with the iconic, the collection launched exclusively on June 10 in a specially-designed concept at the Coach store in Soho, New York and at Colette, the celebrated store on rue St. Honore in Paris. It will release on June 17th on coach.com and Coach stores worldwide.

The collection is part of a series of exclusive, limited-edition projects that celebrate American pop culture, and commemorate Coach's 75th anniversary.  The collection will feature Mickey Mouse designs on everything from Coach's leather goods to ready-to-wear, and beyond.   Mickey Mouse's vibrant personality shines through the collection, with specially created sketches by Disney animators. The exclusive artwork appears on t-shirts as well as signature Coach glove-tanned leather bags including the Saddle and the Dinky.

The range also includes sneakers featuring Coach's signature hangtag playfully redesigned in the shape of Mickey's ears. The Mickey ear silhouette is also marked out with punky studs on a biker jacket and a frame on a re-edition of an archival Coach bag from the 1960's 'the Kisslock'.  Collectible pieces like oversize black leather Mickey dolls and shearling beanbags complete the offering.
If you live in New York or Paris, you can shop for these items now!  For everyone else, we can just drool on these sneak peak photos of some of the items from the collection until they finally release on June 17.


Sunday, April 10, 2016

Star Wars: Han Solo Running Costume Vest

The inaugural Star Wars Half Marathon: Dark Side race weekend at Walt Disney World is less than one week away! Since I've already run the Star Wars Half Marathon: Light Side at Disneyland this past January, I'm eligible to participate in the Kessel Run Challenge (a special Coast-to-Coast Challenge that's specifically for the Star Wars races) and receive the Millenium Falcon medal.

I decided to take this opportunity to add an upcycled costume to my growing wardrobe of running costumes.

I first started with a black 100% polyester shirt (same material and feel as other running shirts) that I found for just $4 at a thrift store.

Step 1:  I took off the sleeves at the seam.
Step 2:  I chopped off the bottom of the shirt at the waist to make the final vest shorter.
Step 3:  I cut a vertical line down the front middle of the shirt to transform it into a vest.


Step 4:  I hemmed the arm holes and the bottom hem of the vest.
Step 5:  I used the leftover fabric from the sleeves and the shirt bottom to make pockets based on Internet pictures that I found of Han Solo's vest from "Star Wars Episode IV: A New Hope."  [If you're not already aware, Han Solo has different vests for ANH and RTJ.]  No, I did not use a template; I just eyeballed it and cut.


Step 6:  Now just add a white running shirt (I can use either a long sleeved or short sleeved one) and blue bottoms (either running tights or a running shirt), and I have quick & easy costume that is comfortable enough to run a race and adaptable enough to run in any type of weather.

Saturday, May 16, 2015

DIY Disney costume: Jake and the Neverland Pirates

My son outgrew his store-bought Jake costume, so I made him a new costume.  The problem with a store-bought jumpsuit-style costume is you have to take the whole costume off in order to use the restroom.  But since this DIY costume functions like real clothes, it won't have that problem.

This costume was actually made from upcycled clothing.
I made the vest from a thrifted blue hoodie and yellow T-shirt.
I made the shirt out of a hole-y men's undershirt and black scraps from my quilt project.
The pants are just any pair of blue jeans that my son wears.
The boots are from the original Jake costume.
The bandana is from the original Jake costume.

First I started with the blue vest.  
Step 1:  I cut off the sleeves from the hoodie.
Step 2:  I removed the hood & front pocket.  Then I cut straight down the center of the front.
Step 3:  I used the material from the sleeves to make the collar flaps.  I pinned them to the vest collar.
Here's the front (left) & back (right) of the collar.
Step 4:  I sewed the flaps in place.  Then I trimmed them into the shape.
Here's the front (left) & back (right) of the collar.
Step 5:  I cut a yellow T-shirt into strips and used the strips to line the edges & collar of the vest.

Now onto the pirate shirt.  I started off with one of my husband's old undershirts. It had a few holes in it, which was perfect for the tattered effect.
Step 1:  Spread out the adult shirt flat on the floor.
Step 2:  Placed one of my son's T-shirts on top of the adult shirt.  My son's shirt served as a pattern.
Step 3:  I cut around my son's T-shirt, leaving a 1/4 inch seam allowance.
Step 4:  I sewed up the edges of the fabric to make at new shirt.
Step 5:  I cut a through the front and back of the sleeves.
Step 6:  I cut a slit in the front collar, then sewed two pieces of black ribbon (also upcycled) into an X over the slit.
Step 7:  I used black fabric scraps to make a "belt" and sewed the belt to the bottom of the shirt.

 
To assemble the costume, all my son needs to do is wear ANY PAIR of blue jeans, put on the boot covers, put on the pirate shirt & vest, and put on the bandana headband.
Yay-hay, way to go Mateys!  We just made a pirate costume!  Yo-ho, let's go have some fun!  Arrgh!


Sunday, November 24, 2013

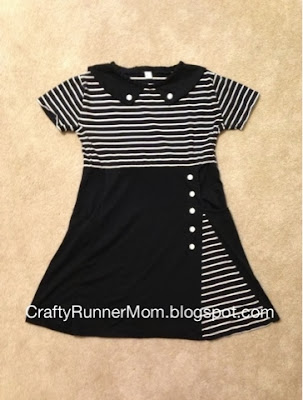
DIY: Upcycled vintage-style dress for Disney Dapper Day


I was invited to my first-ever "Dapper" event at Disneyland which meant that I needed a Dapper outfit.  What is "Dapper?" Well basically the concept comes from Dapper Day, an independent social gathering event when fans show up at the Disney Parks dressed up in clothing styles from 1901-1966 (the years Walt Disney was alive).

So where did I turn for artistic inspiration to find my Dapper outfit? Pinterest of course!  To my disappointment, there weren't a lot of DIY tutorials when I searched for "Dapper Day," just mostly were beautiful photos of other people's outfits. Well, being the Crafty Mom that I am, I decided to accept the challenge of making the outfit myself...doing so in an Eco-friendly way, and adding it to Pinterest.

STEP 1:  FIND INSPIRATION.


Isn't the above outfit from the 1940s just beautiful? I also started falling in love with Peter Pan collars & sailor collars.  I wondered if there was a way to combine the collars with the dress. Then I found this:

The "Vixen 60s Oh So Striped A-line Dress" from Top Vintage.


STEP 2:  GO THRIFT SHOPPING.

The next thing I did was go to a local thrift shop, and luckily I scored these:


STEP 3:  BEGIN DRESS SURGERY.

I cut both dresses at the waistline. I saved the bottom half of the striped dress to make sleeves and the triangle-shaped flare of the skirt.

I saved the top half of the black dress to make the collar.


STEP 4:  PIECE THE FABRICS TOGETHER.

I cut a slit on the side front of the black skirt. Then I sewed a triangle-shaped wedge of striped fabric to fill in that slit. Then I sewed the black skirt to the striped top.


STEP 5:  HOW TO ADD SLEEVES TO A SLEEVELESS DRESS.

I Googled "sleeve pattern" and found a bunch of photos showing that sleeves have the same bell-shaped curve on the top. The difference in fit is based on how STEEP the curve is & how LONG the curve is.

If the curve is STEEP (aka. tall & skinny), then the finished sleeves will lie more vertical & have less comfort, like a suit blazer. But if the curve is SHALLOW (aka.  short & fat), then the finished sleeves will lie more perpendicular to the body & be more comfortable, like a T-shirt.

In order to fit properly, the LENGTH of the sleeve's curve has to equal the circumference of the arm hole.  So I  placed a piece of string around the edges of the armhole to get the circumference & then cut the string into the length of the circumference.  I then taped both ends of that piece of string to the corners of the paper sleeve pattern.  I shaped the loose part of the string into a bell-shaped curve. Once I was satisfied with its shape, I traced its shape onto the paper.

Once I made that rough pattern, I traced it onto a new sheet of paper but this time I added 1/4 to 1/2 inch of seam allowance.  I then used this final pattern to cut out the sleeve material.


Then I sewed the sleeves onto the dress.


STEP 6:  HOW TO ADD A SAILOR COLLAR OR PETER PAN COLLAR TO A TOP.

I drew this pattern myself using the technique described by Erin of Sutton Grace on the Leafy Tree Top Spot blog.  Once I was satisfied with the shape of the front & back collar pieces, I retraced those pieces onto another sheet of paper, this time adding 1/4-1/2 inch of seam allowance. Then I used this final pattern to cut out the collar material.


Then I sewed the collar onto the neckline of the dress using the technique described by Erin of Sutton Grace.  I made a binding strip out of leftover black dress material {Yay! More upcycling!}, then used the binding to cover the raw edges of the collar/neckline.


STEP 7:  ADD THE FINISHING TOUCHES.

I had some old white buttons that had been salvaged years ago from another piece of clothing {Yay! More upcycling!},  so I sewed them on for decoration.

I also added a piece of white grosgrain ribbon to the collar to serve as a tag, but this is just optional. {I just like seeing a tag when I'm getting dressed because it helps to orient me to which side is inside & which side is the back.}

Et VoilĂ !  A Dapper retro upcycled dress is complete!


P.S.  Dressing in Dapper attire with my husband was fun!  I'm looking forward to planning another outfit for a future Dapper Day.