Friday, December 11, 2015

DIY Star Wars chocolates


Since "Star Wars: The Force Awakens" premiers in theaters next week, I'm hosting a Star Wars 6-movie marathon tomorrow.  So I thought it would be fun to serve chocolates in Star Wars shapes.

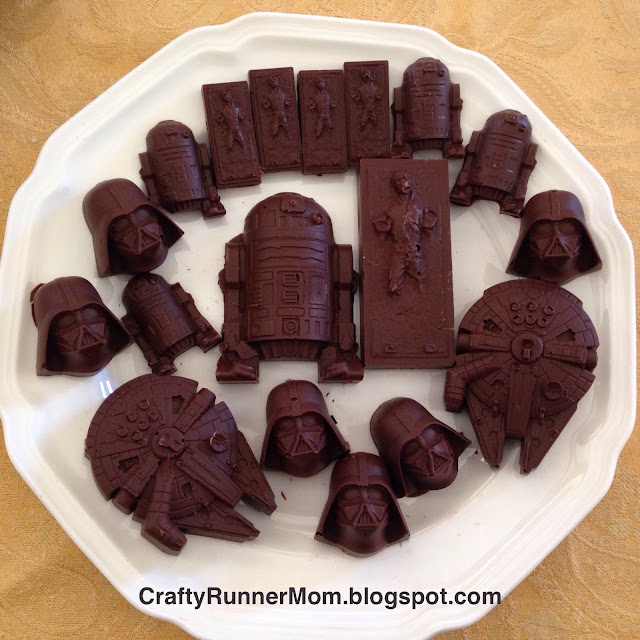
I bought these Kotobukiya ice molds from Amazon.  Dearth Vader, R2-D2, Millennium Falcon, and Han Solo in Carbonite.

I used 1 1/2 bags of chocolate chip morsels (the kind you bake cookies with) to fill all 4 molds.

To make the chocolate, I melted chocolate chips in a Pyrex measuring cup in my microwave for 2 minutes. I stirred it with a teaspoon until it was a smooth consistency.

Then using a teaspoon, I put dollops of chocolate into each ice cube mold. To flatten the chocolate, get rid of bubbles, and make sure that the chocolate got into each crevice of the mold, I lifted each mold and banged them up and down against the table a few times.


I set them aside to cool at room temperature overnight, but I found that they were too brittle when trying to remove them from the molds. So I stuck them in the fridge for a while and that worked perfectly.

Here is the final product. My favorite was the Millennium Falcon because of he level of detail.  The large R2-D2 can stand upright which is cool for a decorative effect. And the Darth Vaders seemed to be the best at sturdiness & ease of removing from the molds.

Now go forth and make some Star Wars chocolates. May the Force be with you!

Wednesday, November 18, 2015

Run10Feed10: 2015 swag bag


This is my third year participating in the Women's Health Run10Feed10 event.  Unlike last year, I wasn't able to attend a live running event this year.  So this year I did the "Run Your Own 10K" virtual race option for a $28 registration fee.

I received my goodie bag today. This is the swag bag that all participants received.  It is a limited edition FEED projects bag.  And it came filled with goodies!

These are the contents of the bag:
  1. Limited Edition FEED projects Voyager canvas & jute tote bag, retail value = $50.
  2. Medela promotional collapsible water bottle, retail value = $1.43.
  3. Colgate Total Advanced Whitening toothpaste, 0.75 oz, retail value = $1.19.
  4. Colgate Total $1 coupons (2)
  5. Colgate Total Gum Health mouthwash, two 2.0 oz bottles, ($5.29 for 16.9 oz), retail value = $0.62 x 2.
  6. Hydroxycut Drops liquid supplement in Fruit Punch, two FULL SIZE bottles, retail value = $6.99 x 2.
  7. Geico promotional Malibu Sunglasses, two pairs, retail value = $1.89 x 2.
  8. Strong Girl Pre-workout supplement in Strawberry Mojito, 0.26 oz ($49.99 for 7.73 oz), retail value = $1.68.
TOTAL RETAIL VALUE: $73.30.

I have to admit that participating in all of these runs is made even more fun by all of the swag that they give runners at these events.

Thursday, November 12, 2015

runDisney featured our Avengers group costume on Twitter

runDisney featured my group costume photo for the Avengers Half Marathon on their Twitter account!  I'm famous!  Okay, I'm exaggerating.

During the 2014 Inaugural Avengers Half Marathon (see my race recap here), one of the runDisney publicity photographers followed us throughout the park and shot a few photos.  She even took a group photo of us in front of the Haunted Mansion.  But the only photo I ended up seeing during race weekend was the photo of us high-fiving cast members that runDisney posted on January 16, 2014 on their Facebook page.

After the 2014 Avengers race weekend was over,  never saw the one of us in front of the Haunted Mansion in any of the runDisney Facebook photos, so I just figured that it was lost and that I'd never see it.

But then for the 2015 Avengers Half Marathon Weekend, runDisney posted that photo on their Twitter account.  How cool is that!?


Wednesday, October 21, 2015

Happy Back To The Future Day!


Happy Back to the Future Day!  THE FUTURE IS NOW!  Today is the day that the movie Back to the Future Part II sent Marty McFly, his girlfriend Jennifer, and Doc Brown from 1985 to October 21, 2015.

Growing up in the 1980's, I watched countless marathons of the BTTF trilogy.  We may not have flying cars, hover boards, Mr. Fusion, and time travel, but I still think Marty & he Doc would be impressed. Who in the 1980's would've imagined the internet, cell phones, hybrid electric vehicles, smart phones, iPads, social media, on-demand streaming of movies & TV shows, online shopping, and paying for purchases thru a watch?!

Welcome to the future Marty & Doc!


P.S.  The following meme just blows my mind. LOL.


Saturday, May 16, 2015

DIY Disney costume: Jake and the Neverland Pirates

My son outgrew his store-bought Jake costume, so I made him a new costume.  The problem with a store-bought jumpsuit-style costume is you have to take the whole costume off in order to use the restroom.  But since this DIY costume functions like real clothes, it won't have that problem.

This costume was actually made from upcycled clothing.
I made the vest from a thrifted blue hoodie and yellow T-shirt.
I made the shirt out of a hole-y men's undershirt and black scraps from my quilt project.
The pants are just any pair of blue jeans that my son wears.
The boots are from the original Jake costume.
The bandana is from the original Jake costume.

First I started with the blue vest.  
Step 1:  I cut off the sleeves from the hoodie.
Step 2:  I removed the hood & front pocket.  Then I cut straight down the center of the front.
Step 3:  I used the material from the sleeves to make the collar flaps.  I pinned them to the vest collar.
Here's the front (left) & back (right) of the collar.
Step 4:  I sewed the flaps in place.  Then I trimmed them into the shape.
Here's the front (left) & back (right) of the collar.
Step 5:  I cut a yellow T-shirt into strips and used the strips to line the edges & collar of the vest.

Now onto the pirate shirt.  I started off with one of my husband's old undershirts. It had a few holes in it, which was perfect for the tattered effect.
Step 1:  Spread out the adult shirt flat on the floor.
Step 2:  Placed one of my son's T-shirts on top of the adult shirt.  My son's shirt served as a pattern.
Step 3:  I cut around my son's T-shirt, leaving a 1/4 inch seam allowance.
Step 4:  I sewed up the edges of the fabric to make at new shirt.
Step 5:  I cut a through the front and back of the sleeves.
Step 6:  I cut a slit in the front collar, then sewed two pieces of black ribbon (also upcycled) into an X over the slit.
Step 7:  I used black fabric scraps to make a "belt" and sewed the belt to the bottom of the shirt.

 
To assemble the costume, all my son needs to do is wear ANY PAIR of blue jeans, put on the boot covers, put on the pirate shirt & vest, and put on the bandana headband.
Yay-hay, way to go Mateys!  We just made a pirate costume!  Yo-ho, let's go have some fun!  Arrgh!